Review the Plan in 3D & Street View
A plan is drawn from above and read from the driver's seat. Those are different views, and a closure that looks obvious in plan can be invisible at 3 ft above the pavement, 500 ft back, at 45 mph.
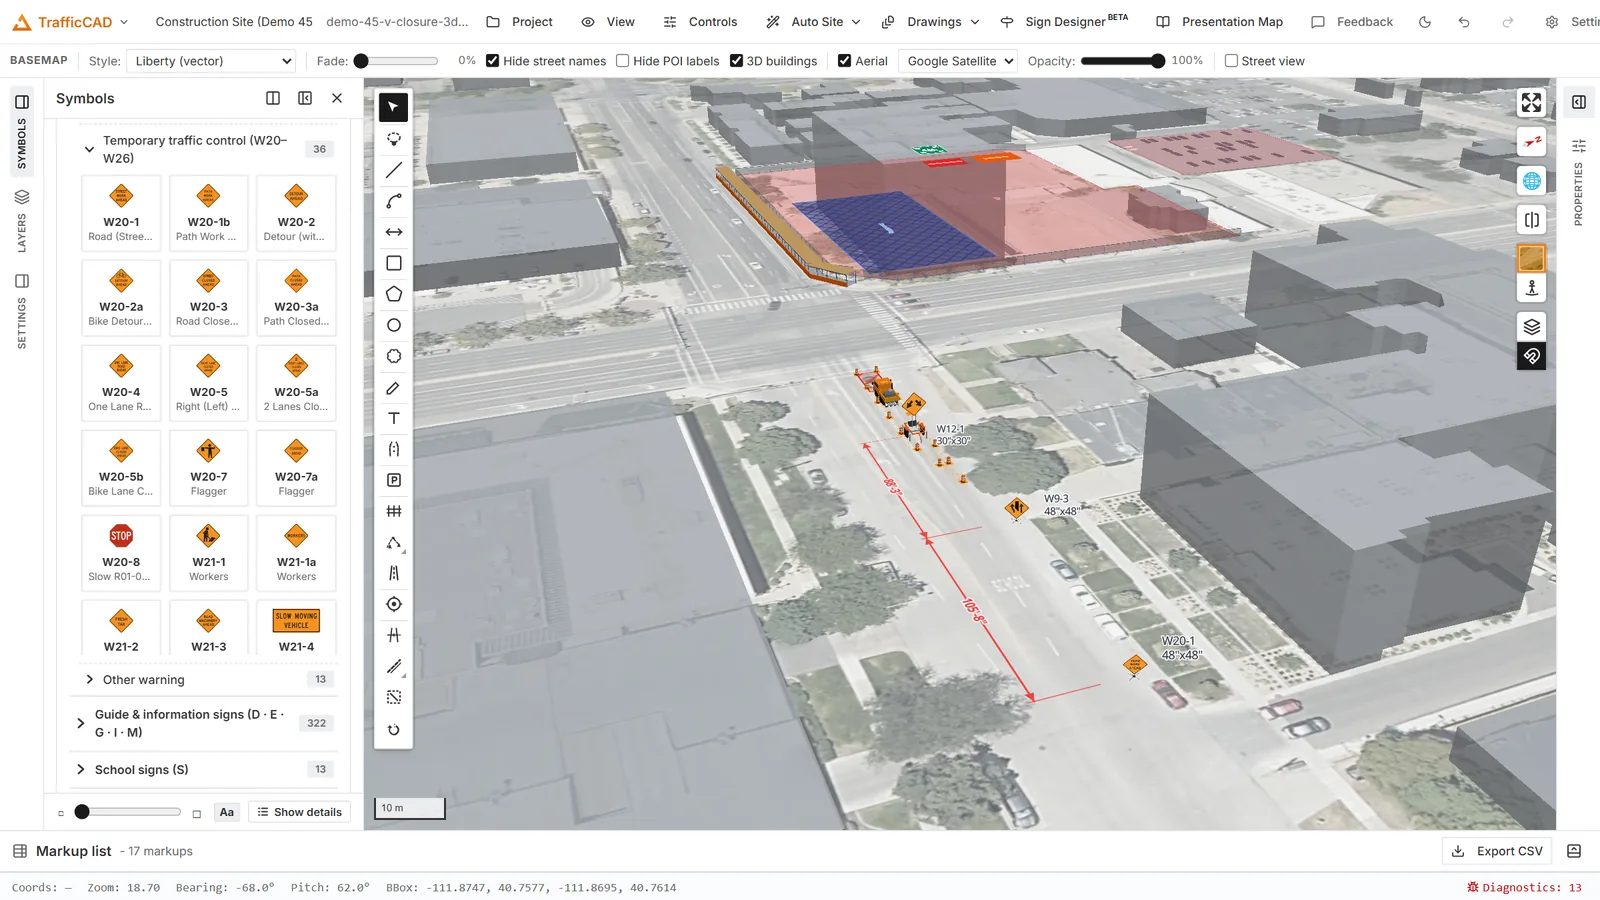
The same plan, stood up. Signs, drums and supports become real objects you can look along.
This tutorial takes a finished plan and checks it from the road before anyone builds it. About ten minutes.
1. Start with a plan worth checking
Open a project that already has advance signs, a taper, and a work space — the output of Your First Traffic Plan, Generate a TTC Plan, or Taper a Work Zone.
2. Stand it up
Tilt the map: hold Ctrl/Cmd and drag, or use View → Reset orientation to get back to plan view afterwards.
Signs, supports, cones, drums, and barricades stand up as real objects. What was a symbol on a map is now something with a height, a face, and a back.
3. Check what each object does in 3D
Select a sign. The Properties panel carries its 3D behaviour:
- 3D display — Stands upright (a real panel on a real support) or Flat on ground (a plan glyph lying on the pavement, for markings and pavement symbols).
- 3D rotation — Faces the camera or Fixed plan heading. Use Fixed plan heading for anything you are checking legibility on: a sign that always turns to face you will look readable from every angle, including the ones where the real thing would be edge-on and useless.
That distinction is the whole point of this exercise. Set the advance signs to Fixed plan heading before you review them.
4. Drive it in street view
Under the on-map Aerial imagery button sits Street view (Mapillary). Click it: coverage appears as green lines and points, and the photo viewer opens.
Click a covered point upstream of your work zone. You are now looking at the real street — with your placed signs, devices, and work areas rendered into the photograph in 3D, at the position and height you specified.
Walk upstream point by point and ask the questions a reviewer will ask:
- Is the first advance sign visible before the driver needs it? Or is it behind a tree, a parked truck, or the crest of a hill?
- Does the taper read as a taper? From a low angle a taper reads as a line of devices converging. If it reads as a wall, the spacing or the length is wrong.
- Do the signs conflict with existing signage? A W20-1 immediately after a permanent guide sign competes with it for the same two seconds of attention.
- Is anything hidden behind something else? Two signs on the same bearing at different distances can occlude each other completely from the approach — which is invisible in plan view and obvious here.
Fix what you find on the map; the street view updates with it.
Coverage is a review aid only
Street-view photography is never included in drawing-sheet captures or exported PDFs. It is there for you to check the design, not to appear on the deliverable.
5. Put the eye-level view on the sheet
Some findings are worth showing rather than describing — "this is what the driver sees" settles an argument faster than a paragraph.
In the Drawings workspace, add a Street view sheet item and point it at the viewpoint you want. It prints as a titled panel alongside the plan.
The same goes for the 3D view: a tilted capture on the cover sheet gives a reviewer the site in one look before they read a single dimension.
6. Brief the people who weren't there
For a phased closure, a static sheet set makes the reader assemble the sequence in their head. A Presentation Map does it for them: chapters with their own camera positions, and the view flying between them as you scroll.
Add one chapter per phase, set each camera to the part of the site that phase touches, and hand over the link. It is the difference between sending a plan and giving a briefing.
Reference: Aerial Imagery & 3D Views · Sign Display, Labels & Leaders · Presentation Maps
Next steps: Publish & Share — turn the reviewed plan into the sheet set and the PDF.